Cocos2d-x basics
Some articles about Cocos2d-x framework
Tiled maps
If you are creating some really large project like a strategy game or a platformer you’ll need some tool to design levels. And this tool is probably Tiled - a universal open source level editor.
Basics
The Tiled interface is similar to other editors so I don’t think there is any need to describe it (but you can check this article if you want). The thing is, you take some tileset created by graphics designer and use this tileset to create a map.
We’ll take this tileset with wizard and knight animations for out first example.
Working with Tiled
The map design has some things special for Cocos2dx:
- one layer in the editor can utilize elements from only one tileset. If you want to use another tileset you have to create one more layer.
- it will be better to keep tileset file (
*.tsx) in the same folder with map file(*.tmx); otherwise you can get some problems during loading - older cocos2d-x versions (like 3.17.2 and lower) were incompatible with newer versions of Tiled editor. However, there is no such problem in Cocos2dx 4.0.
Map loading is easy, it’s only one line of code:
const char mapFilename[] = "beach/beach_map.tmx";

TMXTiledMap* mapNode = TMXTiledMap::create(mapFilename);
if (mapNode == nullptr) {
// error processing
}
addChild(mapNode, ZO_BACKGROUND);
The TMXTiledMap is a subclass of Node so you should already know how to work with it :)
Meta information on the map
There is always some additional information you may want to add to the map. For example, it can be a starting point for the hero or some tiles where moving is prohibited.
In order to create such markings you can do following:
- add some special “meta” layer to the map. This layer should use elements from special “meta” tileset
- during loading your program should process all the information from the “meta” layer and then hide it from the player.
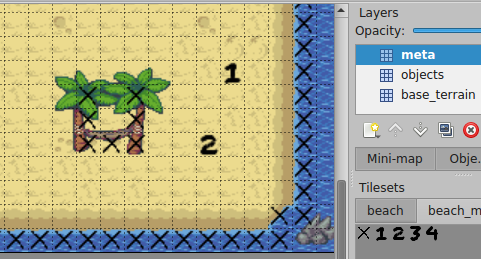
The “meta” tileset can look like this:

Special tiles and custom property
Since players will never see this tiles, it doesn’t matter what pictures are used there. Here it’s just some numbers and letters.
You should add a special integer value (tag) to each meta tile; later the program will use this values to distinguish one tile from another. On the picture below this tag’s field is called “MetaCode”. You can add it by pressing the blue “+” sign at the bottom of the panel.
The meta infirmation loading looks like:
bool SimpleNoScrollScene::loadMetaInfo(TMXTiledMap* const mapNode) {

  const string metaLayerName = "meta";
  TMXLayer* const metaLayer = mapNode->getLayer(metaLayerName);
  if (metaLayer == nullptr) {
    printf("Failed to find %s layer\n", metaLayerName.c_str());
    return false;
  }

  const Size mapSize = mapNode->getMapSize();
  obstaclesMapWidth = mapSize.width;
  obstaclesMapHeight = mapSize.height;
  obstaclesMap = new bool[obstaclesMapWidth*obstaclesMapHeight];
  memset(obstaclesMap, 0, (obstaclesMapWidth*obstaclesMapHeight));

  for (int tileX = 0; tileX < mapSize.width; tileX++) {
    for (int tileY = 0; tileY < mapSize.height; tileY++) {
      const int tileGid = metaLayer->getTileGIDAt(Vec2(tileX, tileY));
      const Value prop    = mapNode->getPropertiesForGID(tileGid);

      if (prop.isNull()) {
        continue;
      }

      const ValueMap vm   = prop.asValueMap();
      const auto frez = vm.find("MetaCode");

      if (frez == vm.end()) {
        continue;
      }

      const int metaCode = frez->second.asInt();

      switch (metaCode) {
      case MMC_OBSTACLE:
        obstaclesMap[obstaclesMapWidth*(obstaclesMapHeight - tileY - 1) + tileX] = true;
        break;

      case MMC_MAGE_START:
        mageStartX   = tileX;
        mageStartY   = mapSize.height - tileY - 1;
        break;

      case MMC_KNIGHT_START:
        knightStartX   = tileX;
        knightStartY   = mapSize.height - tileY - 1;

        currentKnightX = knightStartX;
        currentKnightY = knightStartY;
        break;

        // Note there is no suitable default action here
        // default:
      }
    }
  }

  metaLayer->setVisible(false);

  return true;
}
Here we use getLayer to get the layer and then loop over its tiles. For each tile we try to get the “MetaCode” value (if there is any). Depending on the code value it can be either starting point (for mage or knight) or an obstacle.
Tiled uses coordinate system different from Cocos2d-x. The (0,0) appears in the top left corner of the map, and Y grows from top to bottom. That’s why we should convert Y coordinate values with something like knightStartY = mapSize.height - tileY - 1;.
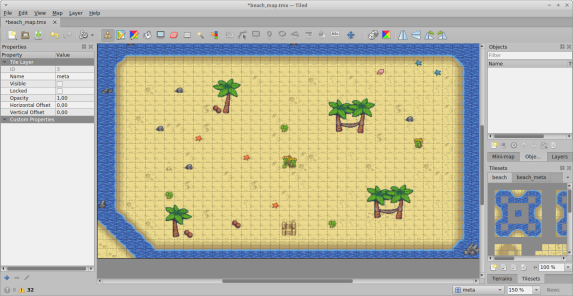
So, we can create a map like this:
A map with markings
And that’s how it will appear in the game:
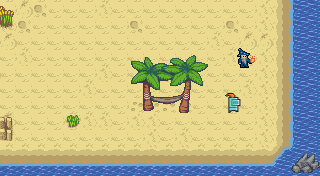
Knight moves towards water
Here meta tileset numbers are used to mark starting points for mage and knight and crosses mark tiles prohibited for walking. Knight moves one tile right, then checks if next move possible. You can see the whole code of the scene in the repo.
Another editors
I should mention the Tiled is not the only possible level editor. There are some more. Also, you can always try to create one by yourself (or at least try).