Cocos2d-x basics
Some articles about Cocos2d-x framework
The Sprite class
In this post we’ll try to create our really own program. It will not do much, only show a few spaceships images from a free pack. Our goal is to learn about Sprite class and its common properties.
Coordinates and the anchor point
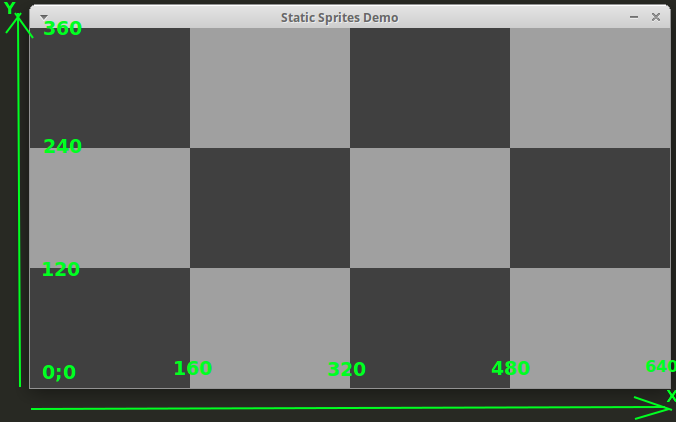
Cocos2d uses “classic” coordinate system:
- x grows horizontally from left to right
- y grows vertically from down to up.
- origin (0;0) appears at bottom left corner (here you can read more about it)
Also there is an “anchor point”. It’s a base point for every transformation that’s performed on a sprite. You can set it with setAnchorPoint method which accepts two values from 0 to 1. Usually this values are 0, 0.5 or 1:
- setActionPoint(Vec2(0.5, 0.5)) sets anchor point at the center of the sprite.
- setActionPoint(Vec2(0, 0)) sets anchor to bottom left.
- setActionPoint(Vec2(0, 1)) sets anchor to top left corner.
When you use setPosition method it actually positions the anchor point and the rest of the sprite gets aligned around it.
A program with background
To see how this all works we’ll use an image that was made of gray rectangles. Each rectangle is 160x120 size.

Empty grid background, axis, sizes
Following code creates this thing:
const char backFilename[] = "background.png";

Sprite* sprite = Sprite::create(backFilename);
if (sprite == nullptr) {
  printf("Error while loading: %s\n", backFilename);
  return false;
}

sprite->setAnchorPoint(Vec2(0,0));
sprite->setPosition(0,0);
addChild(sprite, 0);
Here we create the sprite object with a static create method. That’s a common practice for cocos2d-x; every class has a method like this and it should be used to create new objects instead of traditional new.
Then we set the sprite’s anchor point at bottom left corner and position the sprite at (0;0) which is a beginning of the scene’s coordinate system.
Finally, we use addChild to add the sprite to the scene. The second parameter for this method is a z-order: this value defines priority during drawing. Elements with larger number will be drawn later, so they’ll appear over those ones with lower number.
More sprites
Now let’s add some more sprites. One will use following code:
const char shipFilename[] = "ships/playerShip3_blue.png";

Sprite* sprite = Sprite::create(shipFilename);

sprite->setAnchorPoint(Vec2(0.5,0.5));
sprite->setPosition(Vec2(160, 240));

addChild(sprite, 10);
And another with this code:
const char shipFilename[] = "ships/playerShip3_blue.png";
Sprite* sprite = Sprite::create(shipFilename);

sprite->setAnchorPoint(Vec2(0.5,0.5));
sprite->setRotation(45);
sprite->setPosition(Vec2(160, 120));

addChild(sprite, 10);
The difference here is that second sprite gets rotated by 45 degrees.
Both sprites have anchor point at (0.5,0.5), so the center of the sprites should appear between the squares on the screen:

Blue ships, anchor point at the center
Now let’s add some more sprites:
const char shipFilename[] = "ships/playerShip3_green.png";
Sprite* sprite = Sprite::create(shipFilename);

sprite->setAnchorPoint(Vec2(0,0));
sprite->setPosition(Vec2(480, 240));

addChild(sprite, 10);
and:
const char shipFilename[] = "ships/playerShip3_green.png";
Sprite* sprite = Sprite::create(shipFilename);

sprite->setAnchorPoint(Vec2(0,0));
sprite->setRotation(45);
sprite->setPosition(Vec2(480, 120));

addChild(sprite, 10);
That’s the same as previous pair, but the anchor point is at bottom left corner of the sprite. Again, second sprite gets rotated by 45 degrees.
Result looks like

Green ships, anchor point at bottom left
Here the anchor of the sprite is positioned at the crossing, but the sprite itself becomes upper and more to the right. Also, in second case the rotation is performed against the anchor point.
Node
The Node object can be used to group few other object together. For example, we can build our own spaceship by adding three images:

Building a ship from parts
This can be done like:
const char cockpitFilename[] = "parts/cockpitRed.png";
Sprite* cockpitSprite = Sprite::create(cockpitFilename);

const char wingFilename[] = "parts/wingRed.png";
Sprite* rightWingSprite = Sprite::create(wingFilename);
Sprite* leftWingSprite = Sprite::create(wingFilename);

Node* resultNode = Node::create();
resultNode->setAnchorPoint(Vec2(0.5,0.5));

//
rightWingSprite->setAnchorPoint(Vec2(0.5,0.5));
rightWingSprite->setScale(1, -1);
rightWingSprite->setPosition(Vec2(60, 15));
rightWingSprite->setRotation(90);
resultNode->addChild(rightWingSprite);

leftWingSprite->setAnchorPoint(Vec2(0.5,0.5));
leftWingSprite->setPosition(Vec2(-60, 15));
leftWingSprite->setRotation(90);
resultNode->addChild(leftWingSprite);

resultNode->addChild(cockpitSprite);
//
resultNode->setAnchorPoint(Vec2(0.5,0.5));
First, we create three sprites (body and two wings) and an empty Node object that will join all the parts together.
We rotate the wing sprites and put them at correct position. Coordinates (60, 15) were selected empirically, just to get something that looks more or less good. Also the right wing sprite should be mirrored, the setScale(1, -1) function does that.
Finally, all the sprites became the children of the node object. Now this node object can be processed (added to scene, rotated) as any other sprite, so I will not show this code here. You can find the code for the whole project on github.
So our resulting program will look like this:
