Cocos2d-x basics
Some articles about Cocos2d-x framework
Animation with Dragon Bones
There are many variants to create a skeletal animation but almost all of them are paid and so not available for educational purposes. In this article we’ll work with Dragon Bones, that’s a free, but a bit weird tool.
The Dragon Bones has decent functionality and it’s free. To be presise the editor itself is free as in beer (closed sources) but the code for integrating models into cocos2d-x is distributed under MIT license.
On the bad side, it’s a bit unstable. For example, few months ago it was hard to download the editor from official page because it got some issues with modern browsers. There is a code for integration DB files into cocos2d-x in the official repository, but it’s obsolete and will cause some compilation errors. I’d recommend to use this repository because it has all tweaks required for Cocos2d V4.
Anyway, after getting it up and running the Dragon Bones editor starts to work seamlessly and allows you to create a really cool things like this one:
Example CoreElementGame from official repo
Just note, this mecha is really a 2d picture, you can see it here stripped into parts.
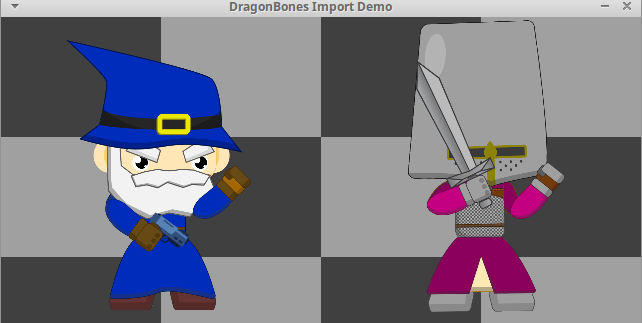
For our example we’ll take medieval persons from this free pack and will give them some swords and guns.
Here I’m not going to tell how to create the models and animations. It’s quite complicated and really that’s more for graphical designers and not for software developers. There is a good tutorial here, and here, and here.
Anyway, after you create a model and export it from Dragon Bones to Cocod2d it will give you three files: two JSONs defining the model and one image with all resources.
Import into the program is similar to opening plist files:
#include "dragonBones/cocos2dx/CCDragonBonesHeaders.h"

dragonBones::CCFactory* factory = dragonBones::CCFactory::getFactory();
factory->loadDragonBonesData("db_export/BlueWizard_ske.json", "BlueWizard");
factory->loadTextureAtlasData("db_export/BlueWizard_tex.json", "BlueWizard");

dragonBones::CCArmatureDisplay* wizard = factory->buildArmatureDisplay("WizardArmature", "BlueWizard");

wizard->setAnchorPoint(Vec2(0.5,0.5));
wizard->setScale(0.33);
wizard->setPosition(160,140);
addChild(wizard, 10);
CCArmatureDisplay is the class for objects you can see on the scene. It’s a subclass of Node, so you can do with it anything you used to do with other scene elements.
“BlueWizard” here is a kind of tag that allows to distinguish this loaded model from all others. The documentation references this parameter as displayName.
“WizardArmature” is an armature name (armatureName), it was specified in the editor like this:
Now if you want to play the animation:
wizard->getAnimation()->play("idle01", 1);//1 to play animation once
That’s how it looks:

It’s possible to change a part of armature in the program and there are two ways to do it.
First, the editor allows storing few images in one slot. For example, here there are three images in the “Gun” slot:
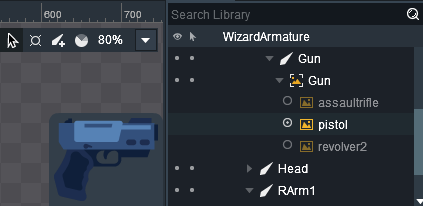
In this case you can switch to another image simply by specifying index:
int currentWeaponIndex;
<....>
wizard->getArmature()->getSlot("Gun")->setDisplayIndex(currentWeaponIndex);
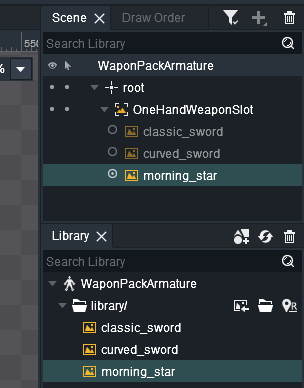
Second, you can create a special model that will contain only images to be changed. This makes loading and usage more complicated:
dragonBones::CCFactory* factory = dragonBones::CCFactory::getFactory();
factory->loadDragonBonesData("db_export/MagentaKnight_ske.json", "MagentaKnight");
factory->loadTextureAtlasData("db_export/MagentaKnight_tex.json", "MagentaKnight");
factory->loadDragonBonesData("db_export/WeaponPack_ske.json", "WeaponPackMK");
factory->loadTextureAtlasData("db_export/WeaponPack_tex.json", "WeaponPackMK");
knight = factory->buildArmatureDisplay("KnightArmature", "MagentaKnight");
<..later..>
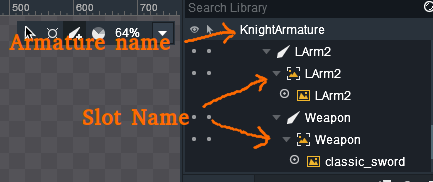
factory->replaceSlotDisplay("WeaponPackMK", "WeaponPackArmature", "OneHandWeaponSlot",
"morning_star", knight->getArmature()->getSlot("Weapon"));
Here “WeaponPackArmature” and “OneHandWeaponSlot” are the names of armature and slot specified in the model:
In both cases result will be the same: